Tvåändsstickning
If you're looking for a way to knit a very warm,
dense, wind-resistant fabric, look no further.
Tvåändsstickning is the ticket! Tvåändsstickning, also
known as Swedish twined knitting and two-end knitting,
uses two strands of yarn that are twisted in between
each stitch. Most patterns for this type of knitting
are circular (think very warm socks, mittens and hats!)
but there's no reason why you can't use this technique
with flat knitting. Traditionally, tvåändsstickning is
done with one color using both ends of a skein.
However, the creative possibilities are countless since
your favorite stitch patterns will take on a new twist
(literally) and you can combine standard knitting with
this technique row to row. Even though it is
traditionally done in one color (one skein), there are
no tvåändsstickning police to stop you from using more.
The technique itself is quite simple: pass the current
working yarn over the previous working yarn. This is
the traditional method. However, you can also pass the
current working yarn under the previous yarn — just
make sure whichever one you choose you do so
consistently. It takes only a little extra time to do
this technique and it creates such a nice warm,
wind-resistent fabric that it's worth whatever extra
time, effort and yarn is needed, especially if you live
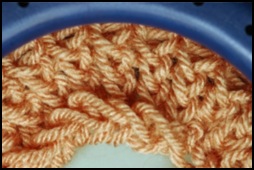
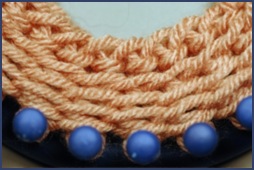
in a very cold climate. The stitches on the RS of the
fabric (picture on the left) will be elongated and the
ones on the WS (picture on the right) will be twisted.
The only tricky part of this technique is not getting
the two working yarns twisted. The tips below should
give you some ideas of how to keep this from happening.
A picture tutorial is also included below.


Needle Knitters
For those who also needle knit, how-tos can be found here:
Traditional Method
- Cast on however you'd like.
- Knit off the first peg as usual.
- Using the tail from the other end of the
skein, knit off the second peg.
You now have two working yarns, each coming from a different end of the skein. If the front of the loom is facing you, the working yarn you used to knit off the first peg (end A) is on the right and the working yarn you used to knit off the second peg (end B) is on the left.
- Let end B lie across the back of the loom
and bring end A over the top end B.
- Knit off the next peg.
Now end B is on the right and end A is on the left.
- Let end A lie across the back of the loom
and bring end B over end A.
- Knit off the next peg.
- Repeat steps 4-7 for the rest of the
fabric.
Essentially, whichever end becomes the active working yarn is brought over the top of the other.
- Bind off however you'd like using end A.
Non-Traditional Method
- Cast on however you'd like.
- Knit off the first peg as usual.
- Using the tail from the other end of the
skein, knit off the second peg.
You now have two working yarns, each coming from a different end of the skein. If the front of the loom is facing you, the working yarn you used to knit off the first peg (end A) is on the right and the working yarn you used to knit off the second peg (end B) is on the left.
- Hold end B in your right hand and and grab
end A with your left and and bring it behind
(under) end B.
- Knit off the next peg.
Now end B is on the right and end A is on the left.
- Hold end A in your right hand and and grab
end B with your left and and bring it behind
(under) end A.
- Knit off the next peg.
- Repeat steps 4-7 for the rest of the
fabric.
Essentially, whichever end becomes the active working yarn is brought over the top of the other.
- Bind off however you'd like using end A.
The tvåändsstickning technique is not difficult and some of you have probably done it while knitting columns of colors unknowingly. The hardest part of this technique is to keep your working yarns from getting twisted. With two working yarns coming from the same skein, that can be quite a feat. Here are some tips to help:
- Keep your skein in your lap. Normally, you
have a lot of slack in the working yarn to the
loom to help you keep from knitting to tightly.
Here, you need to keep things a bit more under
control. Keep enough slack on each working yarn
so that it's not taught on either one between
the skein and the loom but keep the working
yarns short.
- Turn the skein as you knit. To help you
keep the correct yarn on top, turn the skein
back and forth with each stitch. This will not
only keep the correct yarn on top but will also
keep the yarn from becoming twisted.
- Try working from the inside of the loom
when working the knit tbl (e-wrap) stitch.
- Use a double-pointed needle or hairpin to secure the skein. See Bagateller for more information.
The tvåändsstickning technique uses two
working yarns, one from each end of the skein. In
this tutorial, different color yarns are used to
help you differentiate between the two working
yarns (end). They will be referred to as End
A and End B throughout the tutorial.
Which one is the current, or active, working yarn
changes with each stitch. End A will be
active for one stitch, End B the next,
End A for the one following that, and so
on.
This is a picture tutorial of steps above for
both the Traditional and Non-Traditional Methods.
Steps 1-3 are the same for both so the
Non-Traditional Method picks up at step 4. The
difference between the two is how the working
yarn crosses. For the Traditional Method, it
crosses in front; for the Non-Traditional method,
it crosses in back. You can use either method,
but you should not mix them. The last two
pictures are of the RS and WS of the fabric. The
twisting will appear on the WS; the RS looks
basically the same except the stitches are a
little elongated.
If you click on a thumbnail, a larger picture and
information are presented in the content area. If
you click on the picture in the content area, a
larger version of the picture will be displayed
with Slimbox.


For the Traditional Method, the
working yarn crosses in front of the
other before knitting off. To help you
make sure that you cross in front instead
of behind, lay both ends behind the
stitches across the loom. Now when you
cross the yarn, it will cross in front.
Make sure that the yarns do not cross at
any other time and keep them from
becoming twisted. See Tips for more
information about how to do this.
In the picture above, End B is on
the left and End A is on the
right. In this case, End B was
just used to knit off the last stitch
making End A the active working
yarn. The next step will be to cross the
yarns and then knit off the next
stitch.
Knit off the stitch on peg. In this example, a knit stitch is used but you can use whatever stitch is called for in the pattern.
If you are working a knit tbl (e-wrap) stitch, you do not have to bring the active working yarn to the front of the peg. You can just e-wrap the peg that needs to be worked off which means bringing the active working yarn to the back of the peg and around. The important this is crossing the other working yarn.
Setup the working yarns for the next stitch just like you did for the previous stitch: lay both ends behind the stitches across the loom without crossing them. This time, End A is on the left and End B is on the right, making End B the active working yarn. The next step will be to cross the yarns and then knit off the next stitch.
The Non-Tradition method works in a similar manner as the Traditional except that the working yarn crosses in back, not in front of the other yarn. To help you accomplish this, lay the yarns in front of the pegs instead of behind. Now, when you cross the working yarn, it will cross behind. Make sure that the yarns do not cross at any other time and keep them from becoming twisted. See Tips above for ideas on how to do this.
Setup the working yarns for the next stitch like you did for the previous stitch: lay both ends in front of the stitches in front of the loom without crossing them. This time End A is on the left and End B is on the right, making End B the active working yarn. The next steps will be to cross the yarns and then knit off the next stitch.
Coming soon!


