How to Read Patterns and Charts for the
Round Loom & Rake and Knitting Board

There are a couple of things to remember while
working with patterns, especially if you are converting
needle patterns. The first is that you start from the
bottom on all looms and knit your way up. And the
second is that unlike needle knitting, loom knitting
has the RS (right side) always facing you.
Patterns have their own language. Common abbreviations
found in all patterns and specific loom abbreviations
are noted before. These will quickly become part of
your vocabulary. Most patterns will include a key if
there is an abbreviation that you do not recognize.
Each line of a pattern is read from left to right, just
as you read English. How you knit it, however, is
determined by the type of knitting and the loom. This
is discussed below. The first line of a pattern is
always at the bottom of your finished work. Each row
builds on top of the next.
Charts also have their own language. There are some
common abbreviations but you will find that even these
change between editors. Charts should include a symbol
legend to help you determine which stitch is which. If
you make your own charts and use your own symbols,
don't forget to keep a symbol legend. Keep it with the
chart and in your knitting journal. All charts are read
starting at the bottom row and are read up. Whether you
read from the left or the right is determined by the
type of knitting and the loom. It matches how you knit.
Below are overviews of how to read for the different
types of knitting on the two major categories of looms.
This is something that every knitter needs to learn and
is a must if you want to convert needle knitting
patterns.
Circular patterns are read from left to right
for each row, just as in English. The charts,
however, are read the same way as you knit them:
all rows from right to left starting with the first
row on the bottom. This means that the sample chart
above would be knit on the loom as:
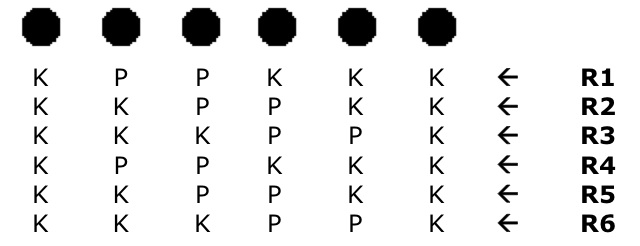
The example above is written in
the order that you knit but remember that the
first row you knit is actually at the bottom of
the project while it is on the loom.
And written as:
- R1: K3, P2, K1
- R2: K2, P2, K2
- R3: K1, P2, K3
- R4: K3, P2, K1
- R5: K2, P2, K2
- R6: K1, P2, K3
Flat patterns are read from left to right for
each row, just as in English. The charts, however,
read the same way as you knit: all odd numbered
rows from right to left and all even numbered rows
from left to right starting with the first row on
the bottom. This is one reason why flat knitting is
taught this way on this site. So the sample chart
above would be knit as:
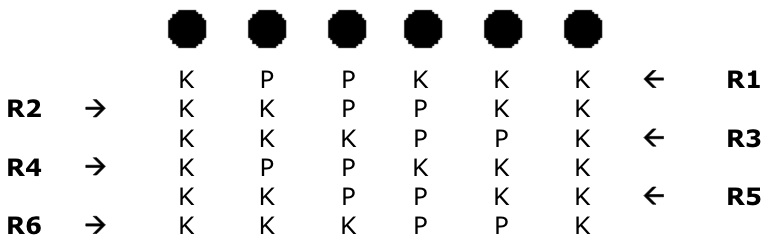
The example above is written in
the order that you knit but remember that the
first row you knit is actually at the bottom of
the project while it is on the loom.
And written as:
- R1: K3, P2, K1
- R2: K2, P2, K2
- R3: K1, P2, K3
- R4: K1, P2, K3
- R5: K2, P2, K2
- R6: K3, P2, K1
Flat patterns are read from left to right for
each row, just as in English. Because you generally
knit off an entire row through a stitch pattern,
most patterns do not use a chart. However, if t
here is a chart, you can read it in either
direction — read it as an entire row instead of
stitch by stitch. You should be able to tell if
it's a ribbing stitch, stockinette stitch, garter
stitch, etc.
Authentic Knitting Boards
has established a simple pattern style. They
start with the number of stitches to cast on
and each subsequent line of the pattern
dictates which stitch pattern to use and for
how many rows. Increases and decreases are
also noted. Their pattern style is the closest
to actual English of all patterns.
The follow abbreviations are general knitting
abbreviations that are essential to know to read a
pattern.
| Abbreviation | Definition |
|---|---|
| x | Stands for times. So 5x would be 5 times. |
| *
(asterisk) |
Repeat the instructions following the * the number of times indicated. |
| ( )
(parentheses) |
Just like in math, the instructions in the parentheses become one unit worked in the place specified in the pattern. So (k2, p2) would mean to work two knit sts and then two purl sts in the place directed in the pattern. |
| [ ]
(brackets) |
Similar to the parentheses, the instructions in brackets are one unit worked as many times as specified. So [k2, p2] 3x would mean to work two knit sts and then two purl sts and then repeat two more times (for a total of 3). |
| approx | approximately |
| BO | bind(ing) off |
| beg | begin(ning) |
| CO | cast(ing) on |
| dec | decrease(s) |
| g or gr | gram(s) |
| in(s) or " | inch(es) |
| inc | increase(s) |
| k | knit |
| k-wise | knitwise, as if to knit |
| k2tog | knit two together |
| MC | main color |
| M1 | make one (an increase) |
| oz | ounces |
| patt(s) | pattern(s) |
| psso | pass slipped stitch over |
| p | purl |
| p-wise | purlwise, as if to purl |
| rep | repeat |
| sl | slip |
| sl 1, k1, psso | slip 1, knit 1, pass slipped stitch over |
| skp | same as above |
| ssk | slip two stitches knitwise |
| St st | stockinette stitch |
| st(s) | stitch(es) |
| tog | together |
| wyib | with yarn in back |
| wyif | with yarn in front |
| YO or yo | yarn over |
The follow abbreviations are specific loom
knitting abbreviations that are essential to know
to read a pattern.
| Abbreviation | Definition |
|---|---|
| cbs | chunky braid stitch |
| ds | double stitch |
| ew | e-wrap |
| figure eight | figure eight wrap on the knitting board |
| fs | flat stitch |
| hs | half stitch |
| pcs | popcorn stitch |
| pop | popcorn stitch |
| ss | single stitch |
| YRP | yarn around peg |