Converting Patterns
Because loom knitting (round looms, rakes and knitting boards) always has the right side facing when you knit, you will need to convert patterns that were created for needles. The process is easy, especially if you chart it. For those of you who are only interested in the instructions, click here. There are considerations to take into account when converting for each type of loom. You may find it useful to read through these before converting patterns, especially if you are new to converting patterns.
Knitting Board
If you want to work a needle knitting pattern on the knitting board, you have a couple of choices for how to proceed. You can either convert the pattern as you would with the round loom & rake or you can adapt it. Converting is for the die hard knitters who don't mind wrapping each individual peg differently. You'll wrap using either the Stockinette diagonal wrapping method or the Zig Zag diagonal wrapping method and depending on the stitch called for, you will change the placement of the wrapping yarn and knit off different. If this sounds like too much work, you want to adapt the pattern instead. You will use the common stitch patterns wrapping methods found on this site to come up with a project that has the feel of the pattern but it won't be exact. Both methods will give you a chance to use needle knitting patterns; choose whichever suits your needs and skill level.An Overview and Considerations
Considerations on Converting Needle Knitting Patterns to Patterns for the Round Loom & Rake
In loom knitting, all of the rows are knit on the right side (RS). This is true for both circular and flat panel knitting. Needle knitting is different. It is the same for circular knitting but it is not for flat. Because needle knitting alternates between right side (RS) and wrong side (WS) rows, you will need to convert the wrong side (WS) row stitches. Normally these are the even row stitches but you need to read the pattern to determine whether the even or the odd row stitches are wrong side (WS). In addition, the even rows need to be worked in the opposite order. So, when the even rows are WS, they need to be converted and the stitches worked in the opposite order; when the even rows are RS, they only need to be worked in the opposite order. Odd rows will generally stay as written. On the occasions that they are WS, they will need to be converted. Odd rows are never worked in opposite order. To help you keep all of this straight during the conversion process, it's highly recommended that you chart it out. Information on how to do this is presented in Step 2 in the section below on how to convert patterns.
Converting Needle Knitting Patterns to
Patterns for the Knitting Board
Straight conversion of needle knitting
patterns to the knitting board is similar to the
round loom and rake. It may feel somewhat odd to
convert patterns though since one doesn't
generally setup each individual stitch to match a
pattern like you do on the round loom or rake. If
you are a knitting board knitter who prefers to
rely on the known stitch patterns, you may prefer
to adapt patterns instead of converting.
When you convert, you can either make both side
of the fabric the same or you can make one side
of the fabric match the pattern and the other
side Stockinette. Which one you choose will
determine which wrapping pattern you'll use. If
you want both sides of the fabric to be the same,
use the Stockinette diagonal wrapping method. If
you would like stockinette on the opposite side
of the converted pattern, use a modified Zig Zag
diagonal wrapping method. To modify it, keep the
zig zag going in the same direction wrapping from
left to right and from right to left. Otherwise
you will end up with a plaited look which may not
be what you want. It will still lean in one
direction but it will do so uniformly. Make sure
to note it in the converted pattern and/or your
knitting journal for future use.
Once you chosen which diagonal wrap method to
use, use the correct basic stitch wrap
(knit, knit tbl, purl, purl tbl and slip
stitches) for each peg. This will ensure that
your stitches are the same in the finished
project as in the pattern. You can use stitch
patterns but be aware that even symmetrical
wrapping patterns are not the same on each
side but similar so it may not match the
pattern. For example, using the diagonal wrap
method for a double rib stitch pattern
produces k3, *p2, k2; rep from * end k3 on one
side and on the other side produces k2, *p2,
k2; rep from * end k2. This will become
noticeable when joining fabric, e.g., two
sides of a sweater.
Below is a list of the similarities and
differences between converting to the round loom
& rake and the knitting board. It is highly
recommended that you chart out the pattern to
make it easier to setup the knitting board for
your knits and purls. See Converting Needle
Knitting Patterns below for more
information.
How it's similar
- The right side (RS) of the fabric always faces you. In this case, it does on both the front and the back of the fabric. Decide ahead of time if you want both sides to be the same or different.
- You will need to convert the wrong side (WS) rows in the pattern. With the exception of the stitches noted below, convert the stitches the same way as in Converted Stitches Table.
How it's different
- Increases. You are limited to the lifted increase and the yarn over (YO) increase on the knitting board. Unless the pattern specifically calls for a YO increase, use the lifted increase for all of your increases. This won't be an exact match in certain cases, such as the bar increase. See increase stitches for information about how to work these stitches. Remember to check the slant on both sides of the fabric.
- Decreases. Remember that the slant needs to be correct for the fabric. Make sure that you pair each side of the fabric with the correct slant. For example, if a K2tog increase is called for on one side, use the SSK on the other. See decrease stitches for more information.
Tip: since you will be wrapping each peg with either Stockinette or Zig Zag diagonal wrapping method, you will be able to increase and decrease anywhere on the board without changing the wrapping pattern.
Adapting Needle Knitting Patterns to
Patterns for the Knitting Board
The other option you have is to adapt current
stitch patterns available on the knitting board
to the stitch patterns in the needle knitting
pattern. For many patterns, this is a viable
alternative. It's not unusual that a pattern will
use a stitch pattern through sections that you
can then adapt and then you can leave the more
complicated patterns to a straight conversion.
You may find it helpful to chart the pattern
before determining which stitch patterns to use.
Charting will give you a better idea of how the
finished pattern will look. See Converting
Needle Knitting Patterns below for more
information.
Gauge
No discussion on conversion would be complete with a mention of gauge. It is very important that you check the gauge, whether it is on the round loom & rake or the knitting board. On the knitting board, you have the extra issue of the slip stitch between the rakes (see How it works in Knitting Boards). This will alter the gauge which is why wrapping patterns for the same stitch have different guages. If you need to adjust the pattern, see Different Gauge in the article Substituting Yarn.
Twisted Stitches and Gauge
Twisted stitches on the round loom & rake and on the knitting board are bigger than their straight stitches; this is the opposite in needle knitting. This is important to keep in mind because it may change the gauge of the pattern which will affect the size. Always be sure to knit a swatch to check the gauge. If the gauge is bigger, you'll need to either use a smaller gauge loom or you will need to convert the pattern. For information on how to convert the pattern see Different Gauges in the article Substituting Yarn.
Converting Stitches
The following chart has been provided to help you convert the stitches. Note for you needle knitters out there: this chart also works for converting flat knitting to circular knitting.| Stitch Equivalents Converting Needle to Loom Knitting | |||
|---|---|---|---|
| Wrong-sided Stitches | Right-Sided Equivalent | ||
| Basic Stitches | |||
| P (purl) | K (knit) | ||
| K (knit) | P (purl) | ||
| P tbl (purl in back) | K tbl (knit in back) | ||
| K tbl (purl in back) | P tbl (knit in back) | ||
| Sl wyif | Sl wyib | ||
| Sl wyib | Sl wyif | ||
| Cross / Twist Stitches | |||
| Cross L, Knit | Cross R, Purled | ||
| Cross R, Purled | Cross L, Knit | ||
| Cross R, Knit | Cross L, Purled | ||
| Cross L, Purled | Cross R, Knit | ||
| Cable Stitches | |||
| cX over Y left, knit* | cY over X left, purl* | ||
| cX over Y left, purl* | cY over X left, knit* | ||
| cX over Y right, knit* | cY over X right, purl* | ||
| cX over Y right, purl* | cY over X right, knit* | ||
| Decreases | |||
| P2tog | K2tog | ||
| P2tog tbl | Sl1 K1 psso or
work ssk |
||
| K2tog | P2tog | ||
| K2tog tbl | P2tog tbl | ||
| P3tog | K3tog | ||
| K3tog | P3tog | ||
| P2tog pnso | Sl1 K2tog psso | ||
| Sl1 K2tog psso | P2tog pnso | ||
| Increases | |||
| P into back and front | K into front and back | ||
| P into front and back | K into back and front | ||
| K into back and front | P into front and back | ||
| K into front and back | P into back and front | ||
*Where X and Y denotes stitch numbers and X and Y may or may not be equal to each other.
Stitch Pattern Adaption
Here is a chart of possible conversions. Remember that you will need to check the gauge and that you may need to adjust the pattern further (see Different Gauge in Substituting Yarn).| Stitch Pattern Adaptions from Needle to Knitting Board | ||
|---|---|---|
| Needle | Knitting Board | Notes |
| Stitch Patterns | ||
| Stockinette | Stockinette | Knit stitches twisted or not? |
| Zig Zag/
Slant |
Similar: produces plaited look | |
| Garter | Garter | Garter & Rev Stockinette are the same on both; determine ahead of time if you want twisted knit stitches in Garter |
| Reverse Stockinette | Reverse Stockinette | |
| Ribbing | Double Rib | Each side is different. For both box and diagonal, one side is *k2, p2; rep from *, end k2, and the other side is k1, *p2, k2; rep from *, end k1 and k3, *p2, k2; rep from *, end k3, respectively. Use the side that matches what you need. |
| Asymmetrical Rib | Ribbing different on each side; wrap for the "front" side dependent on which pattern you want | |
| Open Rib | Ribbing different on each side; wrap for the "front" side dependent on which pattern you want | |
| Area or Look | ||
| Trim | Asymmetrical Rib | All five of these styles produce a nice trim, each with a distinctive style. Be care of asymmetrical ribs; be sure to choose the side you need to use. See the swatch for each to help you determine which would work best for the pattern. |
| Cris Cross/
Waffle |
||
| Double Rib | ||
| Herringbone | ||
| Open Rib | ||
| Lacy | Eyelet | All four of these style produce a lacy type of fabric, each with a distinctive style. See the swatch for each to help you determine which would work best for the pattern. |
| Loopy Rib | ||
| Open Braid | ||
| Trinity | ||
| Body (Basic Stitch Pattern) | Garter | All four of these style produce a basic fabric, each with a distinctive style. See the swatch for each to help you determine which would work best for the pattern. |
| Reverse Stockinette | ||
| Stockinette | ||
| Zig Zag/
Slant |
||
Converting Needle Knitting Patterns in 4 Easy Steps

Converting patterns is easy. Because loom knitters can get hung up on it, the easiest method for conversion is presented here. It is by far the most common question e-mailed to Loom Knitting Help. Below is a step by step by to converting patterns using the following short needle knitting stitch pattern worked for flat knitting:
- R1 (RS): *K3, P2, K1; rep from * to end
- R2: *P2, K2, P2; rep from * to end
- R3: *K1, P2, K3; rep from * to end
- R4: *P3, K2, P1; rep from * to end
- R5: *K2, P2, K2; rep from * to end
- R6: *P1, K2, P3; rep from * to end
Step 1: Determine which Rows are Right Side (RS) and which are Wrong Side (WS)
The first thing you need to do whenever you
want to convert a pattern is determine which row
is the right side (RS) of the fabric and which is
the wrong side (WS). Needle knitting, unlike loom
knitting, switches back and forth between
knitting on the RS and the WS of the fabric.
Since loom knitting is always done on the RS of
the fabric, WS rows in needle knitting patterns
need to be converted. Converting a stitch means
using the opposite stitch, for example, a knit
stitch for a purl stitch or a purl stitch for a
knit stitch. A complete table of converted
stitches is available under Converting
Stitches.
Usually, the even rows (R2, R4, R6, etc.) are WS
but sometimes this is not the case. When reading
a pattern the first row is normally marked as
either RS or WS. However it is marked, all of the
odd rows will be the same and all of the even
rows will be the opposite. In the stitch pattern
above, the odd rows are marked as RS so that
means the even rows are WS. We now know that the
even rows must be converted.
Step 2: Chart the Pattern
You don't have to chart the pattern but it will make the process much easier. Once it's charted, writing down the pattern will be a snap. There are many different ways to go about charting. Choose the one that fits your style.
- Pencil & Paper. Not tech savvy? This may be the easiest method for you. Use graph paper (there is free special knitting graph paper if you'd like to get fancy) and a pencil and go to it. You can either use standard symbols like those found in Vogue or you can make up your own. Whatever you decide to use, make sure to keep a legend.
- Special Fonts & Word Processor or Spreadsheet. You can setup a table in your favorite word processor or use a spreadsheet (e.g., the free and open source Open Office's Writer and Calc) along with one of the free knitting fonts available (see Software for more information).
- Charting Software. There are several different charting software available for knitters on both the Windows and Macintosh platforms (see Software for more information). All of them will chart a needle knitting pattern but you may have to convert it to loom knitting yourself if you'd prefer the pattern instead of just the chart.
- R1 (RS): *K3, P2, K1; rep from * to end
- R2: *K2, P2, K2; rep from * to end
- R3: *K1, P2, K3; rep from * to end
- R4: *K3, P2, K1; rep from * to end
- R5: *K2, P2, K2; rep from * to end
- R6: *K1, P2, K3; rep from * to end
Tip: For some stitch patterns, you will find it easier to chart two or three times the number of stitches called for so you can see the repeat. You may also want to double or triple the number of rows called for, too. When charting a pattern, however, this is not necessary.
Step 3: Write Down the Pattern: Round Loom & Rake
The round loom & rake writes out the pattern the same way that it is knit. The odd rows are written moving on the chart from right to left (as you knit them) and the even rows are written moving on the chart from left to right (as you knit them). So the above pattern now becomes
- R1: *K3, P2, K1; rep from * to end
- R2: *K2, P2, K2; rep from * to end
- R3: *K1, P2, K3; rep from * to end
- R4: *K1, P2, K3; rep from * to end
- R5: *K2, P2, K2; rep from * to end
- R6: *K3, P2, K1; rep from * to end
Step 3: Write Down the Pattern: Knitting Board, Option 1
There currently isn't a standard way to write
out converted patterns for the knitting board.
The following is one suggestion until a standard
is agreed upon. A second suggestion follows in
Step 3b. Be sure to note on the converted
pattern which suggestion you used. After all of
your hard work, you don't want to end up knitting
it incorrectly.
This option is suggested to be used with the
Stockinette diagonal wrap method. You will find
it easier to keep both sides of the fabric the
same for this one instead of having one side as
the converted pattern and the other in
Stockinette. Again, make sure to note it in the
converted pattern and/or your knitting journal
for future use.
- Write all of the rows from left to right as
you start wrapping the beginning of each row
for the Stockinette diagonal method. The above
pattern would then become
- R1: *K1, P2, K3; rep from * to end
- R2: *K2, P2, K2; rep from * to end
- R3: *K3, P2, K1; rep from * to end
- R4: *K1, P2, K3; rep from * to end
- R5: *K2, P2, K2; rep from * to end
- R6: *K3, P2, K1; rep from * to end
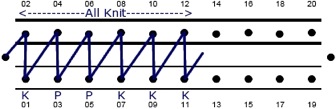
Left to Right: P2 K, P3 P, P6 P, P7 K, P10 K, P11 K
Right to Left: P12 K, P9 K, P8 K, P5 P, P4 P, P1 K

Each peg would wrap the working
yarn above or below the current wrap on the peg
depending on whether it was a knit or purl.
If the row is long and you find it difficult to
read the line backwards, you can write it out
both directions:
- R1a: *K1, P2, K3; rep from * to end
R1b: *K3, P2, K1; rep from * to end - R2a: *K2, P2, K2; rep from * to end
R2b: *K2, P2, K2; rep from * to end - R3a: *K3, P2, K1; rep from * to end
R3b: *K1, P2, K3; rep from * to end - R4a: *K1, P2, K3; rep from * to end
R4b: *K3, P2, K1; rep from * to end - R5a: *K2, P2, K2; rep from * to end
R5b: *K2, P2, K2; rep from * to end - R6a: *K3, P2, K1; rep from * to end
R6b: *K1, P2, K3; rep from * to end
Step 3: Write Down the Pattern: Knitting Board, Option 2
This is the second suggestion for how to write out the converted pattern. This option is suggested to be used with a modified Zig Zag diagonal wrap method. Make sure the you keep the zig zag going in the same direction wrapping from left to right and from right to left. Otherwise you will end up with a plaited look which may not be what you want. It will still lean in one direction but it will do so uniformly. When using the Zig Zag diagonal wrap method, you can either keep the stitches the same on both sides of the fabric or make one side entirely stockinette. Again, make sure to note it in the converted pattern and/or your knitting journal for future use.
- Write the odd rows from left to
right and the even from right to left (opposite
of the round loom & rake). This matches the
way you knit with a Zig Zag diagonal pattern
though you would need to modify it. See
Converting to the Knitting Board for
more information. This option would make the
pattern be
- R1: *K1, P2, K3; rep from * to end
- R2: *K2, P2, K2; rep from * to end
- R3: *K3, P2, K1; rep from * to end
- R4: *K3, P2, K1; rep from * to end
- R5: *K2, P2, K2; rep from * to end
- R6: *K1, P2, K3; rep from * to end
The second row would look like
this, worked from right to left:

Each peg would wrap the working yarn above or below the current wrap on the peg depending on whether it was a knit or purl.
Step 4: Knit!
Once you have the pattern written out, you're
ready to work the pattern. Have fun!