Bar Increase Stitch (K1f&b / P1f&b)
The most common increase used is the bar increase. This increase is a visible increase. A horizontal bar will chase the increased stitch on the right side of the work, regardless of whether you work a knit or purl stitch. There are two different methods for working the stitch. Choose whichever works best for you.| Bar Increase Stitch | |
|---|---|
| Advantage | If used in a series, forms a pattern |
| Disadvantage | Makes a bar or nub on the RS of the fabric when working in St st |
| When Used |
|
Method 1
This method works the front of the stitch for the increase. It has been temporarily removed while we fix it.
Method 2
This method works the back of the stitch for the increase.
- Bring the working yarn in front of the peg,
above the wrap on the peg.
- Place the knitting tool under the wrap on
the peg in the groove.
- Turn the knitting tool up in the groove and
under wrap.
- Grab the working yarn by circling around
the outside and then around its top catching it
as you slide the tool down the groove of the
peg. This will create a new wrap.
- Grab the new wrap with your fingers and
pull up to take wrap on the peg off.
- Place new wrap in your fingers on the peg.
- Instead of pulling the yarn to tighten the
new wrap as you normally do with a knit stitch,
place your knitting tool in the back of the
stitch (behind the peg) and pull it over to the
empty peg.
- Now pull the working yarn to tighten the
knit stitch and the wrap placed on the empty
peg.
. - E-wrap the peg you just placed the new wrap on and knit off.
Method 1
This method works the front of the stitch for the increase. It has been temporarily removed while we fix it.
Method 2
This method works the back of the stitch for the increase.
- Bring the working yarn in front of the peg,
above the wrap on the peg.
- Place the knitting tool under the wrap on
the peg in the groove.
- Turn the knitting tool up in the groove and
under wrap.
- Grab the working yarn with the knitting
tool by circling around the outside and then
and then around the bottom catching the working
yarn as you slide the knitting tool up the
groove of the peg. This will create a new wrap.
- Grab the new wrap with your fingers and
pull up to take wrap on the peg off.
- Place new wrap in your fingers on the peg.
- Instead of pulling the yarn to tighten the
new wrap as you normally do with a purl stitch,
place your knitting tool in the back of the
stitch (behind the peg) and pull it over to the
empty peg.
- Now pull the working yarn to tighten the
purl stitch and the wrap placed on the empty
peg.
. - Work a p tbl stitch with the new wrap that you just tightened.
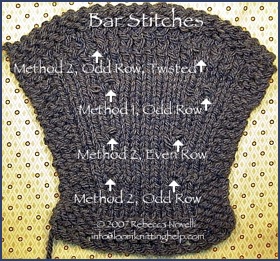
Pictures of the Bar Increase
This swatch contains three examples of the bar increase and one of the twisted bar increase. There are two different methods pictured for the bar increase but currently only instructions for the method used first two (starting from the bottom) are given due to the hole created by the method used for the third. We will be working on that method to eliminate the hole and then will put it back on the site. If you click on a thumbnail, a larger picture and information are presented in the content area. If you click on the picture in the content area, a larger version of the picture will be displayed with Slimbox.


This swatch was knit by Rebecca
Novelli on the loom. There are four sets
of bar increases in the piece. From the
bottom up, the first two sets use method
2, the third uses method 1 and the fourth
uses method 2 with the twisted knit
stitch (k tbl f&b). Details of the
increases are shown in other pictures in
this set. Instructions for method 1 has
temporarily been removed from the site.
This method produced a largish hole with
TKGA has said is not acceptable for a bar
stitch.
Picture information:
- Copyright: © 2007 Rebecca Novelli
- Aperture: f/4.1
- Shutter Speed: 1/60
- Focal Length: 17.7mm
- Image Date: Apr 13, 2007 7:24:19 PM
This swatch was knit by Rebecca
Novelli on the loom. Is is the same
picture but closer in than Loom Knit
Swatch 1. Three of the four sets of bar
increases are displayed. Details of the
increases are shown in other pictures in
this set.
Picture information:
- Copyright: © 2007 Rebecca Novelli
- Aperture: f/4.1
- Shutter Speed: 1/60
- Focal Length: 17.7mm
- Image Date: Apr 13, 2007 7:24:19 PM
This third set of bar increases was
worked using method 1. They were worked
into an odd row. Instructions for this
method have been removed from the site
until the hole can be fixed. TKGA has
found it not acceptable.
Picture details:
- Copyright: © 2007 Rebecca Novelli
- Aperture: f/8
- Shutter Speed: 1/20
- ISO Speed Rating: ISO(200)
- Focal Length: 105mm
- Flash: 0
- Image Date: Apr 14, 2007 6:51:47 PM
This fourth set of bar increases was
worked using twisted knit stitch as the
main stitch using method 2. It was worked
into an odd row on the right-hand side of
the loom.
Picture details:
- Copyright: © 2007 Rebecca Novelli
- Aperture: f/8
- Shutter Speed: 1/20
- ISO Speed Rating: ISO(200)
- Focal Length: 105mm
- Flash: 0
- Image Date: Apr 14, 2007 6:52:58 PM


