Slip Stitch
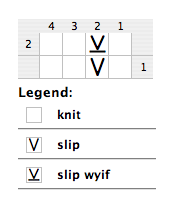
When you slip a stitch, you simply don't knit that peg but bring the working yarn around either the front or the back of the peg, depending on the type of slip. Some slip stitch tips:
- Slipping a stitch in the row, lengthens the
stitch in the previous row and creates a thick,
padded fabric perfect for the heel of a sock.
- Slipping the same stitch from row to row will
make steps or a ladder up and down your fabric.
- Using different colors on slipped stitches over
the course of many rows will create a pretty speckled
pattern.
- Slipping a stitch at the beginning of the row creates a pretty braided edge.
wyib
wyif
slip 1st st in row
Video
- Do not wrap the peg where you want the
slipped stitch, instead bring the working yarn
in back of the peg and knit the stitch on the
next peg.
- When you come back to that peg in the next
row, use the wrap from the previous row to knit
off the stitch there.
- Instead of wrapping or otherwise knitting
the peg, bring the working yarn in front of the
peg and work on the stitch of the next peg.
- When you come back to that peg in the next
row, move the yarn below the loop that is there
and knit your desire stitch off.
- Pick up the wrap that is one the peg with
your knitting tool and take it off of the peg
and hold it.
- Move the yarn from the slipped stitch into
the center of the loom.
- Replace the wrap that is being held back
onto the peg.
- Continue knitting the rest of the row.
Slipping the first stitch in each row causes braided, tighter and more even edge without increasing the width.
- Slip the first stitch by bringing the
working yarn around the inside of the loom and
knit the next stitch.
- Wrap the rest of the stitches in the row.
- Repeat steps 1-2 for the remaining rows.
Coming soon!